Regardless of how you harvest, bale and store hay, the purpose of haymaking is to feed animals. Be they beef cattle, dairy cows, horses, goats . . . even llamas if you raise ‘em! If it’s four-legged on the farm or ranch, hay is probably a necessary source of nutrition. Especially during cold winter months. So when it comes to our haymaking basics – cutting, baling, and storing hay – nutrition quality is the top priority.
Now before we get started, here are a couple of key points to make. First, we’re going to be talking about grass hay, as opposed to legumes like alfalfa. The parameters for cutting, raking, and baling alfalfa are quite different from grass hay, primarily because of the plant leaf.
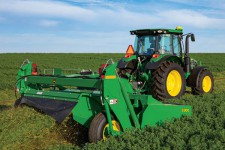
And second, for this project we used a John Deere 5125M Utility Tractor (US CA), a John Deere C350 Mower Conditioner (US CA), or MoCo, and a John Deere 460M Round Baler (US CA). But the same principles would apply if we had used any other type of equipment for mowing, windrowing, and baling grass-type hay.
Okay. Let’s start with haymaking basic #1: cutting grass hay.
Ideally, grass hay should be cut just before it sets its seed heads. At that point, the nutritional quality of the grass stem will be at its peak. As the seed heads set, the plant moves from growth to reproduction state, and nutritional value starts to decline. So when the very first seeds start to appear, it’s time to mow. At that point, pick the first stretch of at least 3 straight days without rain in the forecast, and get started. Three days is the minimum time it normally takes to cut, dry, and bale non-mature hay in southeast Kansas. But your schedule should match your specific location, type of crop, and yield.
Day 1
Get started cutting your hay early in the morning on Day 1. Then let it dry on the ground for the rest of the day. Sunlight, wind, and conditioning are the primary factors in how fast your cut hay will dry. And moisture content is the primary factor for baling. So set your cutting height to allow for a stubble length that will keep your cut hay off the ground surface, which will help both the drying and baling process.
Day 2
Ideally, cut hay should be dry enough to rake sometime on Day 2. And this is where the Art of Haymaking comes into play, because experience is the best teacher here. As it dries, your cut hay should start to take on a lighter color. When you take a handful and give it a twist, the dry stalk should just begin to crackle a bit and perhaps shed a little chaff. If you need to rake your hay into windrows, this is the time to do it. Raking will speed up drying time significantly. So don’t rake too early if you’re not ready to bale.
Day 3
On Day 3, let the morning dew dry off. Then it’s time for some more of the Art of Haymaking. When the dew is gone, grab an armful of hay from a couple windrows from where the heaviest crop in the field is. Feel for any limp or damp hay. It should be dry and more crackly. The more often you do this, the more you’ll start to notice an unmistakable dry hay smell. Sort of warm and a bit dusty. Finally, grab a handful, hold it at each end, and try to yank it apart. If it breaks on the first pull, it’s ready to bale.
Here’s another haymaking basics tip. Don’t wait until your hay is too dry. It’s better to start baling earlier than later. Once the crop is dry, there’s no going back. But if it’s still too wet, you can always let it dry a little longer.
The objective in baling is to make dense, well-shaped bales. If you’ve matched your windrow size to your baler pickup, you should be able to stay centered over the windrow allowing your baler to do its job most efficiently. If your windrow is narrower than your baler pickup, you’ll probably need to shift from side to side as you move over the windrow when you’re starting a new bale so the baler is properly filled and your bales are well-shaped cylinders, not loose and oval.
Once baling is done, it’s time to store those bales.
Large round bales like those we’ve made and have been wrapped with net wrap can be stored under cover, or outdoors. If storing outdoors, always place them in line with the ends snug against each other and the rows at least 3 feet apart so the sides are exposed to full sunlight. Choose a location that is consistently as dry as possible and not in the shade under trees. The more your bales are exposed to moisture, the greater the chance of developing mold and reducing their quality as a food source for livestock.
We can’t quite say “that’s all there is to it,” but we can say if you follow these haymaking basics, you’ll be well on your way to producing, cutting, and baling hay you can be proud of.
Now don’t forget, always read the Operator’s Manual before storing or operating any piece of equipment, and follow all operating and safety instructions.
And remember, if you’re looking for equipment that’s built to get the job done season after season, year after year, you’ll find it – and all kinds of advice on how to use it – every day at your John Deere dealer.
The Basics of Haymaking.
Regardless of how you harvest, bale, and store hay, the purpose of haymaking is to feed animals. Be they beef cattle, dairy cows, horses, goats . . . even llamas if you raise ‘em! If it’s four-legged on the farm or ranch, hay is probably a necessary source of nutrition. Especially during cold winter months. So when it comes to our haymaking basics – cutting, baling, and storing hay – nutrition quality is the top priority.
Now before we get started, here are a couple key points to make. First, we’re going to be talking about grass hay, as opposed to legumes like alfalfa. The parameters for cutting, raking, and baling alfalfa are quite different from grass hay, primarily because of the plant leaf.
And second, for this project we used a John Deere 5125M Utility Tractor (US CA), a John Deere C350 Mower Conditioner (US CA), or MoCo, and a John Deere 460M Round Baler (US CA). But the same principles would apply if we had used any other type of equipment for mowing, windrowing, and baling grass-type hay.
Okay. Let’s start with haymaking basic #1: cutting grass hay.
Ideally, grass hay should be cut just before it sets its seed heads. At that point, the nutritional quality of the grass stem will be at its peak. As the seed heads set, the plant moves from growth to reproduction state, and nutritional value starts to decline. So when the very first seeds start to appear, it’s time to mow. At that point, pick the first stretch of at least 3 straight days without rain in the forecast, and get started. Three days is the minimum time it normally takes to cut, dry, and bale non-mature hay in southeast Kansas. But your schedule should match your specific location, type of crop, and yield.
Day 1
Get started cutting your hay early in the morning on Day 1. Then let it dry on the ground for the rest of the day. Sunlight, wind, and conditioning are the primary factors in how fast your cut hay will dry. And moisture content is the primary factor for baling. So set your cutting height to allow for a stubble length that will keep your cut hay off the ground surface, which will help both the drying and baling process.
Day 2
Ideally, cut hay should be dry enough to rake sometime on Day 2. And this is where the Art of Haymaking comes into play, because experience is the best teacher here. As it dries, your cut hay should start to take on a lighter color. When you take a handful and give it a twist, the dry stalk should just begin to crackle a bit and perhaps shed a little chaff. If you need to rake your hay into windrows, this is the time to do it. Raking will speed up drying time significantly. So don’t rake too early if you’re not ready to bale.
Day 3
On Day 3, let the morning dew dry off. Then it’s time for some more of the Art of Haymaking. When the dew is gone, grab an armful of hay from a couple windrows from where the heaviest crop in the field is. Feel for any limp or damp hay. It should be dry and more crackly. The more often you do this, the more you’ll start to notice an unmistakable dry hay smell. Sort of warm and a bit dusty. Finally, grab a handful, hold it at each end, and try to yank it apart. If it breaks on the first pull, it’s ready to bale.
Here’s another haymaking basics tip. Don’t wait until your hay is too dry. It’s better to start baling earlier than later. Once the crop is dry, there’s no going back. But if it’s still too wet, you can always let it dry a little longer.
The objective in baling is to make dense, well-shaped bales. If you’ve matched your windrow size to your baler pickup, you should be able to stay centered over the windrow allowing your baler to do its job most efficiently. If your windrow is narrower than your baler pickup, you’ll probably need to shift from side to side as you move over the windrow when you’re starting a new bale so the baler is properly filled and your bales are well-shaped cylinders, not loose and oval.
Once baling is done, it’s time to store those bales.
Large round bales like those we’ve made and have been wrapped with net wrap can be stored under cover, or outdoors. If storing outdoors, always place them in line with the ends snug against each other and the rows at least 3 feet apart so the sides are exposed to full sunlight. Choose a location that is consistently as dry as possible and not in the shade under trees. The more your bales are exposed to moisture, the greater the chance of developing mold and reducing their quality as a food source for livestock.
We can’t quite say “that’s all there is to it,” but we can say if you follow these haymaking basics, you’ll be well on your way to producing, cutting, and baling hay you can be proud of.
Now don’t forget, always read the Operator’s Manual before storing or operating any piece of equipment, and follow all operating and safety instructions.
And remember, if you’re looking for equipment that’s built to get the job done season after season, year after year, you’ll find it – and all kinds of advice on how to use it – every day at your John Deere dealer.

